Tool Canvas
Learn how to integrate and manage your business tools within the Tools Canvas to get the most out of your tools.
Written By Brian Ragone
Last updated About 5 hours ago
Available with any of the following subscriptions, except where noted:🟢 Starter (up to the plan’s step limit) | 🔵 Builder | 🟣 Optimizer |
⚫ Enterprise
Managing business tools can be overwhelming, especially when juggling multiple platforms, costs, and usage. Puzzle’s Tool Canvas simplifies this by giving you a centralized, visual space to manage all the tools powering your operations.
Instead of relying on scattered spreadsheets, the Tool Canvas offers visibility, structure, and control—from tracking tool spend and usage to grouping tools by department or project.
This guide walks you through exploring, adding, organizing, and managing tools efficiently within Puzzle.
Benefits of Using the Tools Canvas
🔗 Centralized View: Visualize your entire tech stack in one place
⚖️ Cost Transparency: Monitor tool spend across monthly and annual views
⚙️ Process Alignment: Quickly identify where each tool is used in your workflows
🛠️ Custom Grouping: Organize tools by team, project, or stack for smarter management
How to Manage Your Tech Stack in Puzzle using Tool Canvas
Step-by-Step Guide
1️⃣ Set Up Your Tool Canvas
1️⃣ Set Up Your Tool Canvas
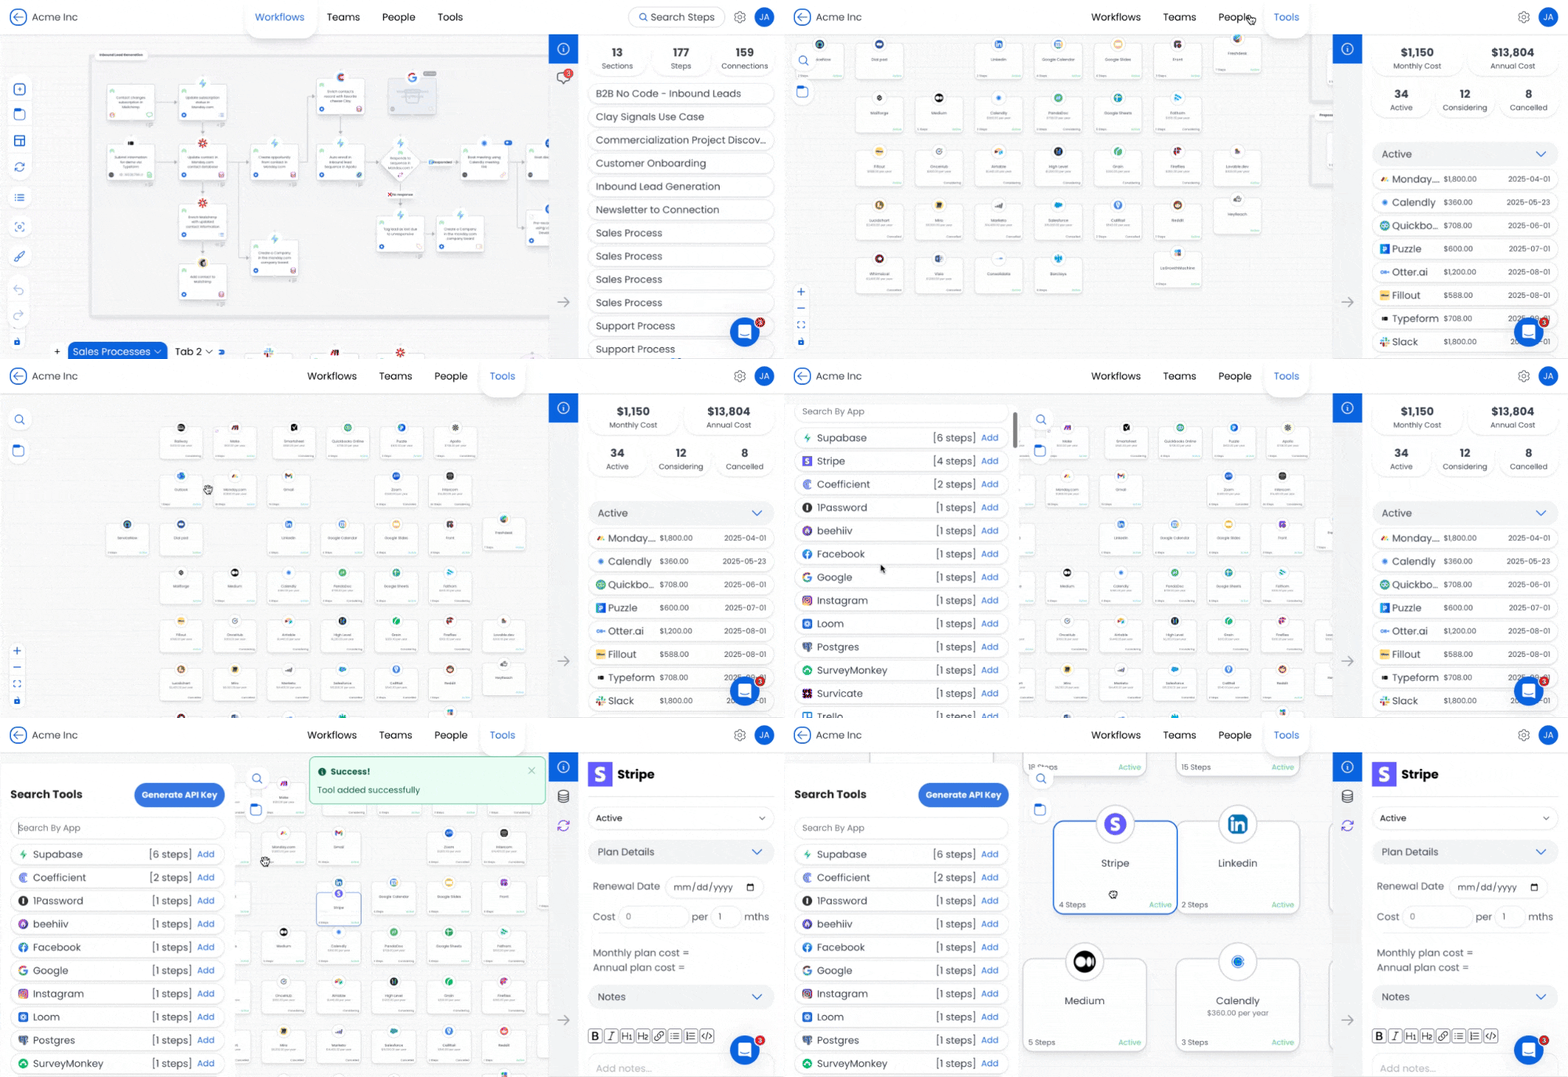
Head to the Tools tab in your workspace to open the Tool Canvas. The right sidebar shows your tools grouped by status (Active, Considering, Cancelled), total counts, and cost summaries where available.
Two ways to add tools to your workspace:
🛒 Option A: Add from the Puzzle Library
🛒 Option A: Add from the Puzzle Library
Puzzle has a built-in Tools Library of common tools used across workflows.
Click the 🔍 icon in the upper-left corner of the Tool Canvas
Search for or browse existing tools
Click Add to add it to your Tool Canvas
🛠️ Option B: Create a New Custom Tool
🛠️ Option B: Create a New Custom Tool
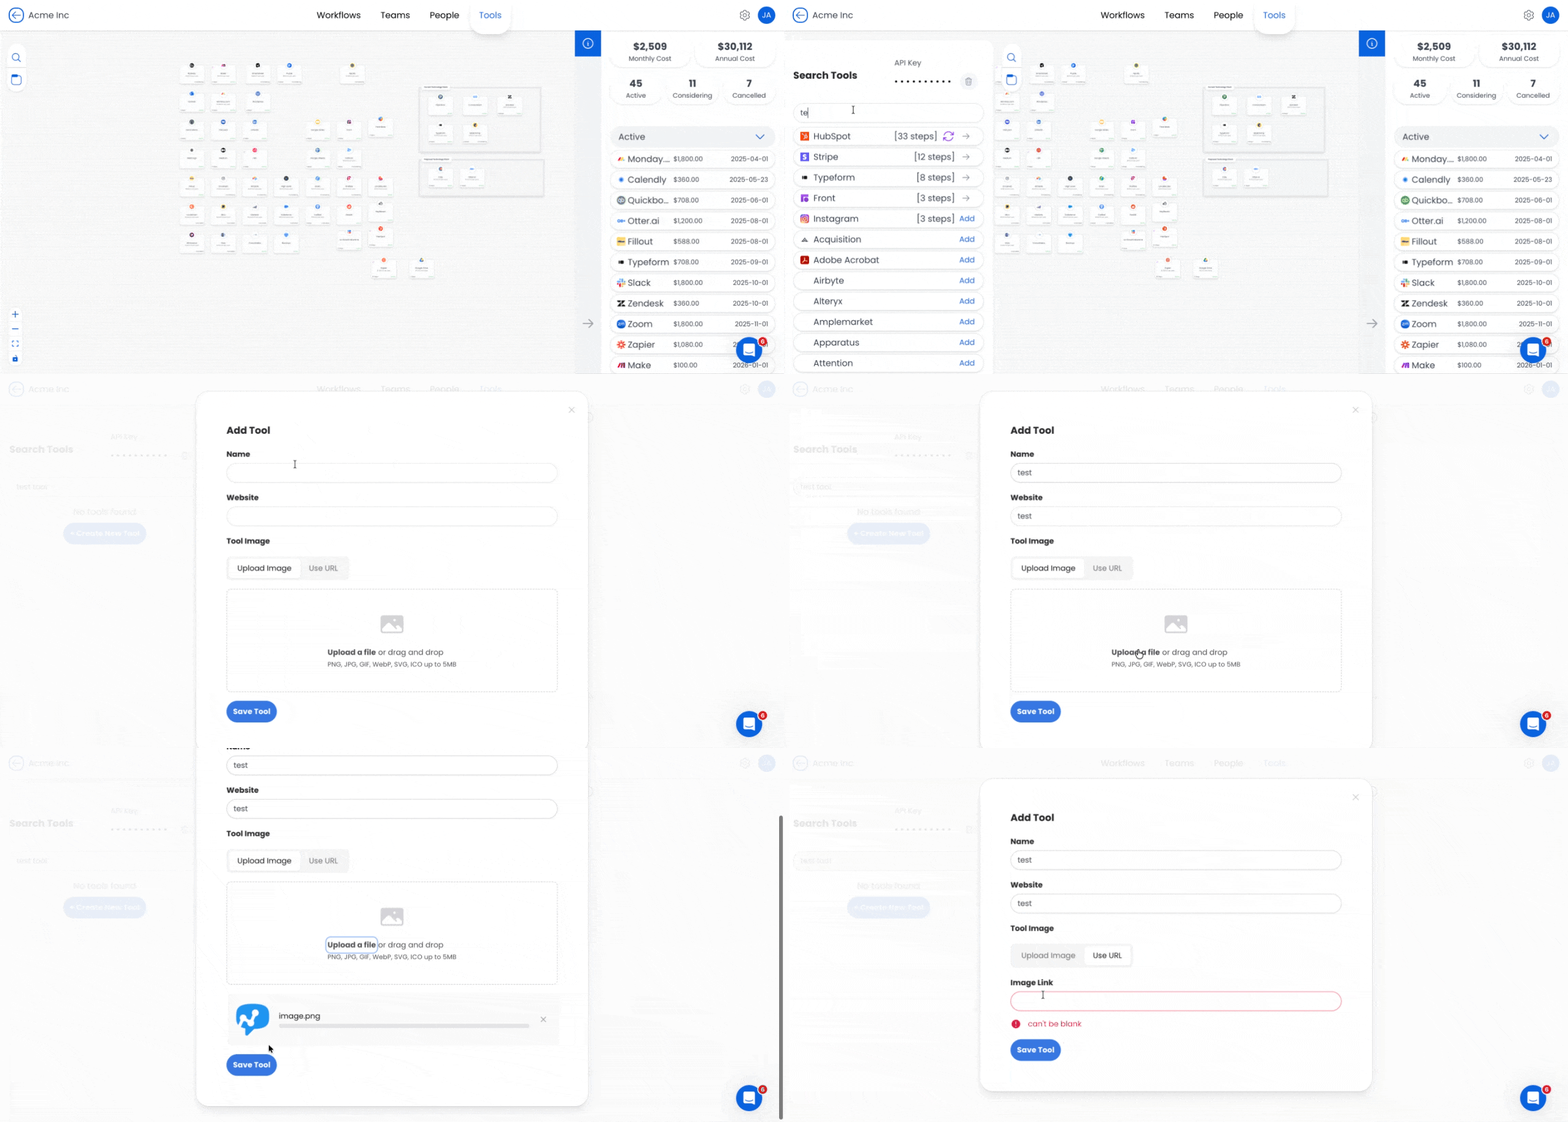
If the tool isn't available in the Puzzle Tools Library, create it manually. Two entry points:
From the Tool Canvas:
Click the 🔍 icon in the top-left corner
Click Create a new tool
Fill out: Tool Name, Upload an Image (PNG, logo, or icon), Tool Link (URL, optional)
Click Save
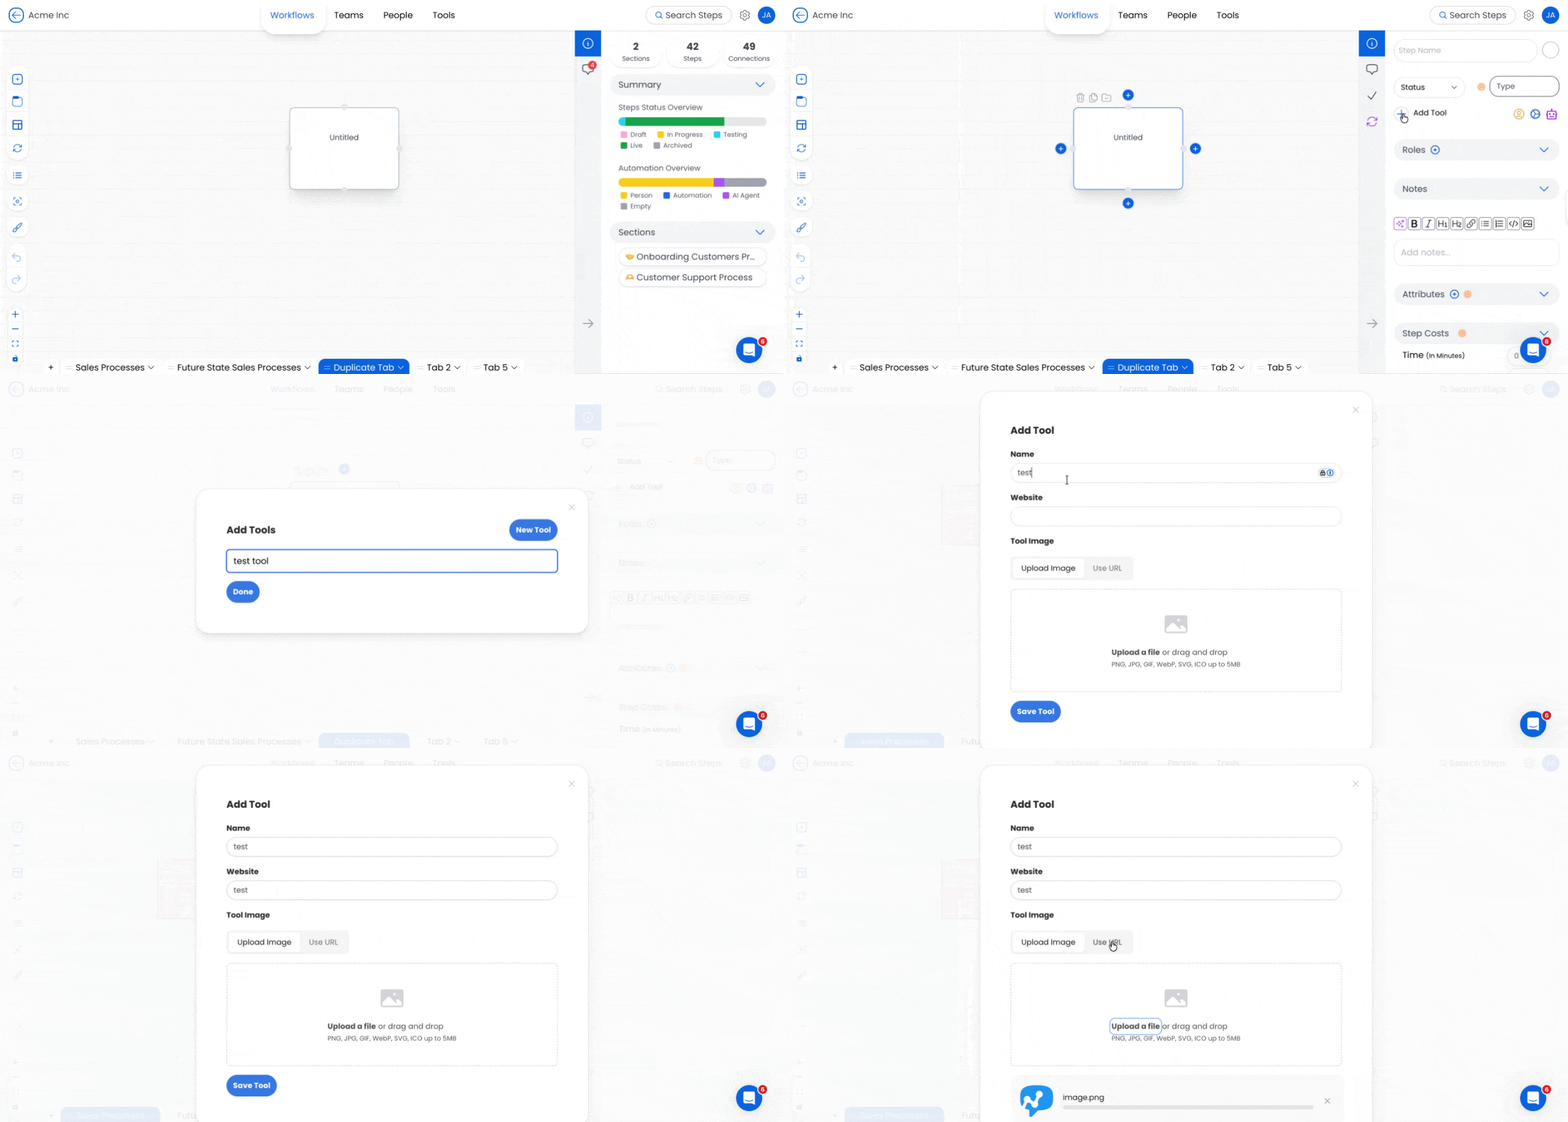
From a Workflow Step:
Inside any workflow step, click ➕ Add Tool in the Step Sidebar
Click New Tool in the popup window
Fill out: Tool Name, Upload an Image, Tool Link (optional)
Click Save — your tool will be available across your workspace
📌 Need to edit a tool after creating it? Puzzle uses a shared, community-wide Tools Library. Because tools can be reused across many workspaces, tools can't be edited directly in-app after they've been created. If a tool was saved with the wrong name, broken logo, or incorrect link, our support team can update it quickly — email support@puzzleapp.io with the tool name and what you want updated.
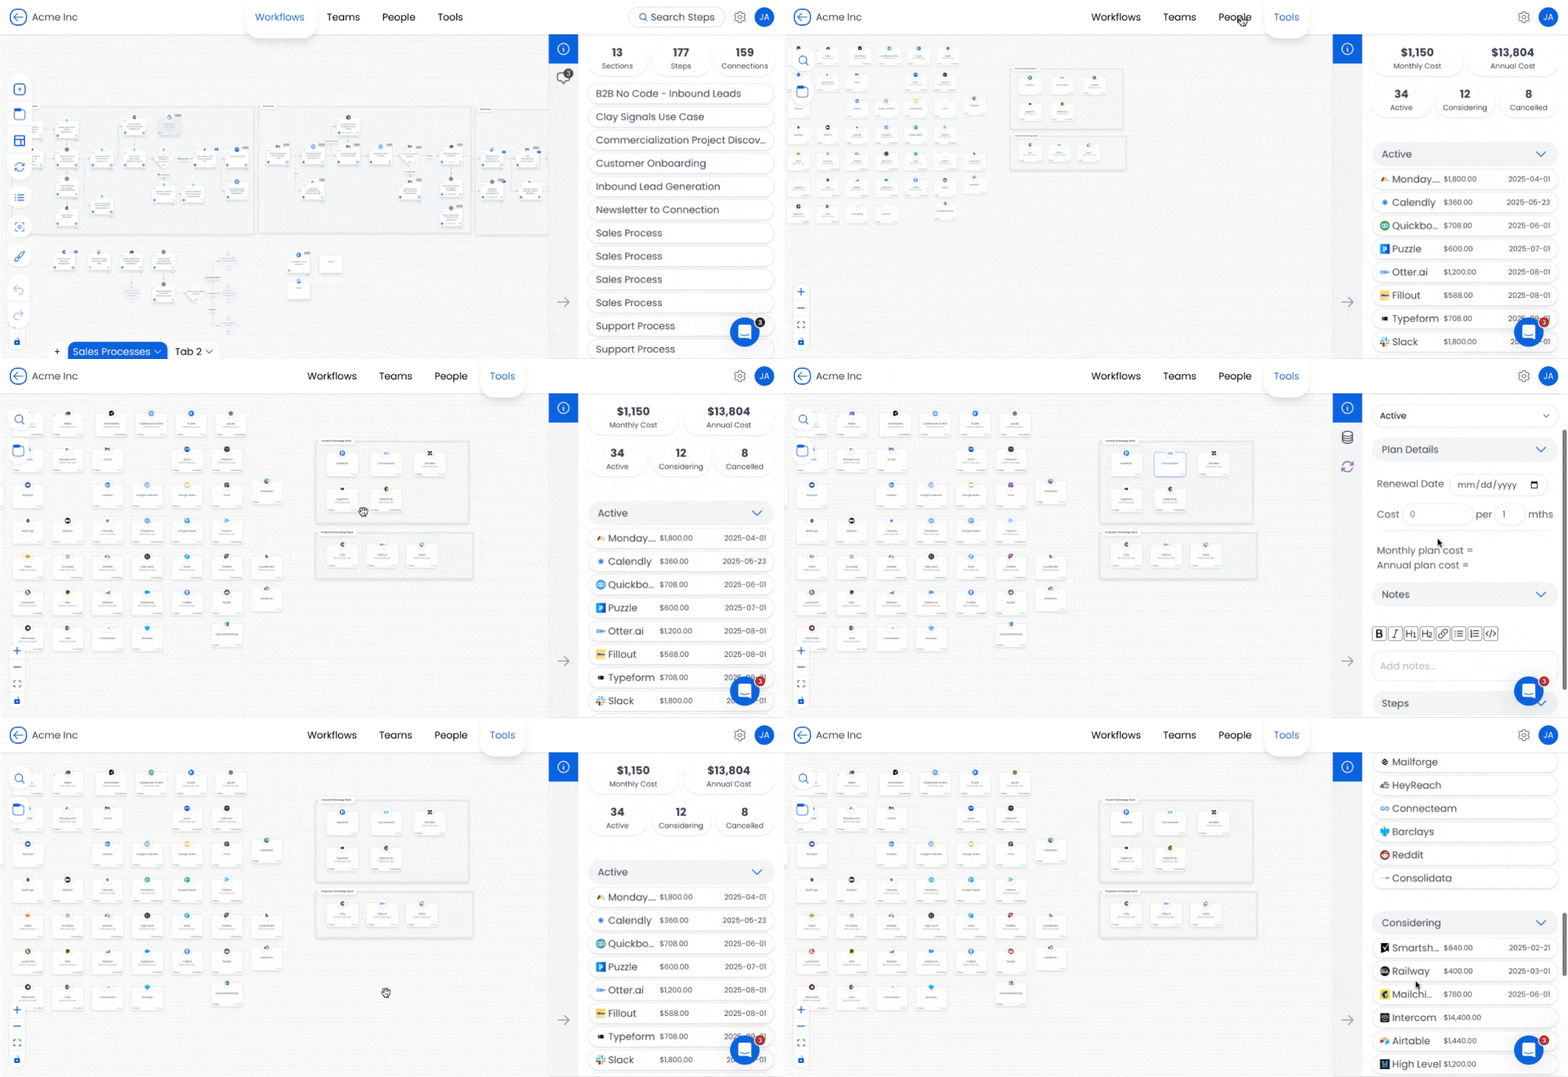
🧭 Go to the Tools tab in your workspace to open the Tool Canvas.
📝 In the right sidebar, you'll see:
Tool list grouped by status: Active, Considering, or Canceled
Total Number of Active, Considering, and Canceled Tools
Cost summaries (Monthly and Annual) only appear on plans that include tool cost tracking.
(Starter, Optimizer, Enterprise)
💡 If your plan includes Cost Summary but it doesn’t update immediately after adding new information to your tools, refresh the page to update the details.
2️⃣ Customize Tool Details
2️⃣ Customize Tool Details
When you click a tool card on the canvas, a sidebar appears with editable fields.
🤖 Prefer AI? Use Claude, ChatGPT, or any MCP-capable AI to manage tools without leaving the chat. Ask your AI to update a tool's notes, contract length, or renewal date — or add and read cost items on any tool. Reference the tool by name in your prompt.Read the Puzzle MCP article for setup.
📊 Assign a Tool Status
📊 Assign a Tool Status
Track where each tool stands in your tech stack. Use the Status dropdown to label tools as:
Active – In use
Considering – Under evaluation
Canceled – No longer used
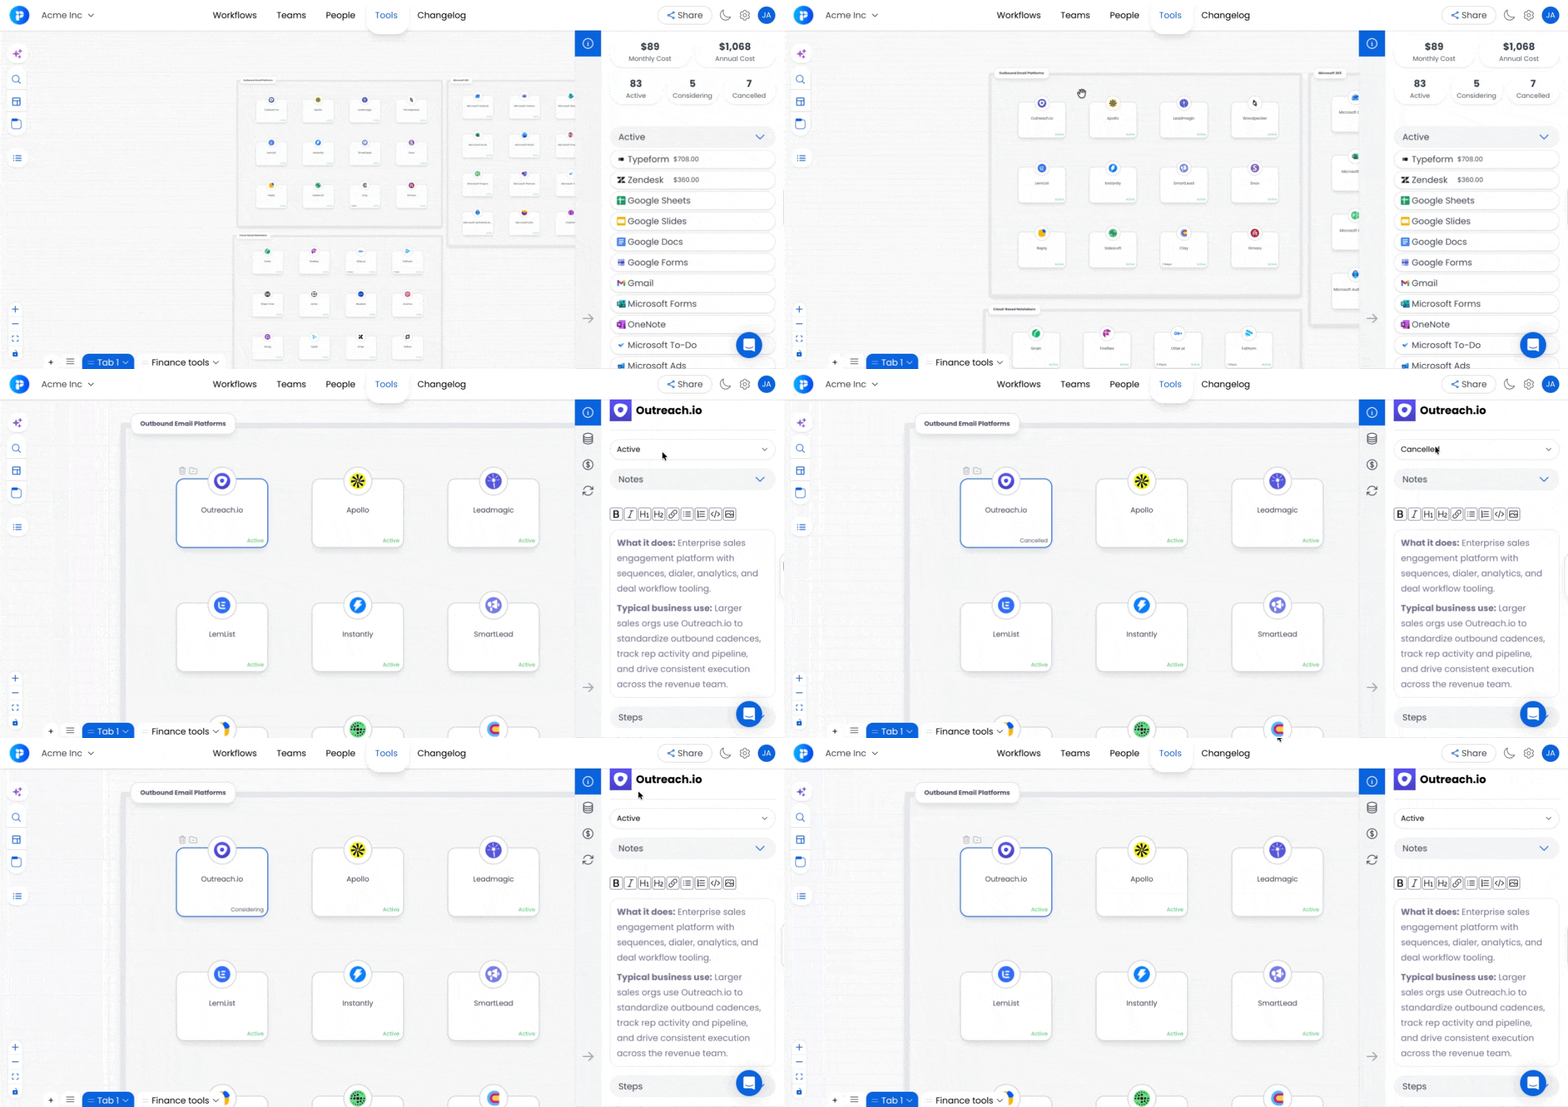
💰 Add Cost Items to a Tool
💰 Add Cost Items to a Tool
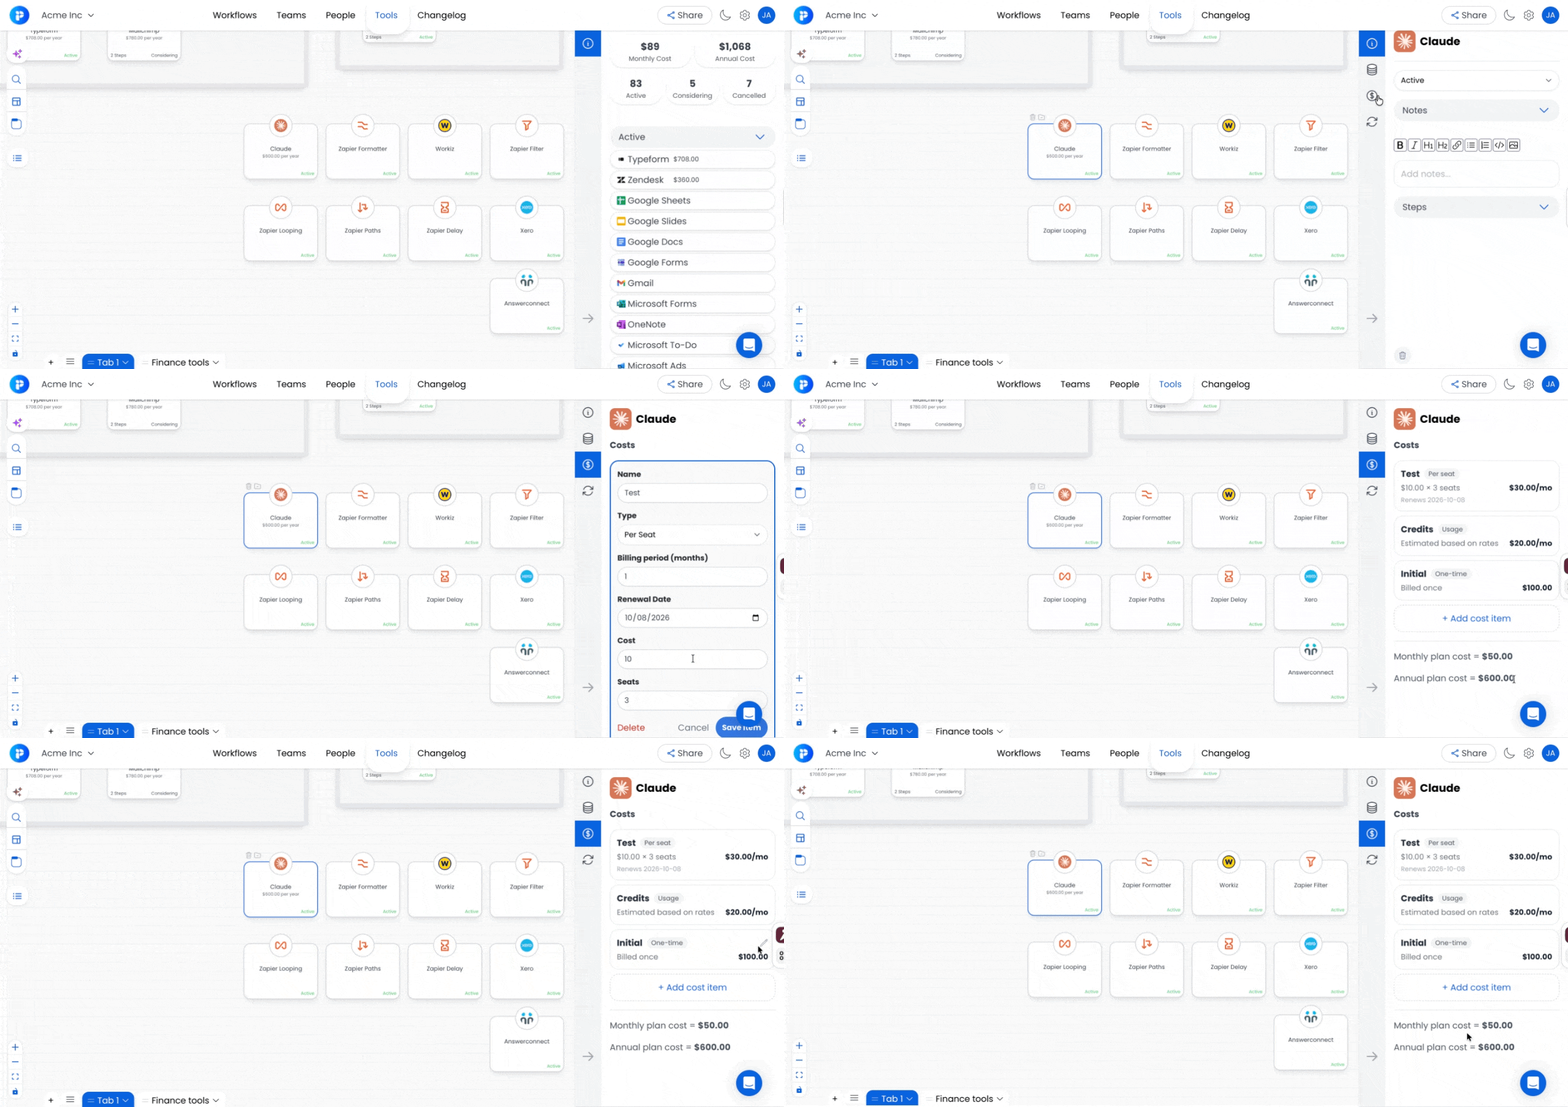
Track multiple cost items on the same tool to match how it's actually billed (e.g., per-seat + usage-based API charges).
Click ➕ Add Cost Item in the tool's sidebar
Name the cost item (e.g., "Seat license," "API usage," "Add-on")
Pick the cost type, fill in the fields, and save
💱 Cost values display in your workspace currency. Set your preferred currency from Workspace Settings → Currency. All tool cost items, monthly and annual totals, and Tool Group cost summaries reflect this setting.
Four cost types to choose from:
🪑 Per Seat — Cost per seat × number of seats × billing cycle. Includes renewal date.
📈 Usage — Rate reference (e.g., "$0.02 per 1,000 API calls") + estimated monthly spend.
🔁 Flat Fee — Flat monthly or annual subscription (equivalent to the old "Subscription" cost type). Includes renewal date.
💸 One-Time — Single upfront cost. Not included in recurring spend totals.
💡 Tip: Add multiple cost items to model tools with hybrid pricing. Combine Flat Fee with Usage, or Per Seat with a One-Time setup fee, so your process cost calculations reflect what you actually spend.
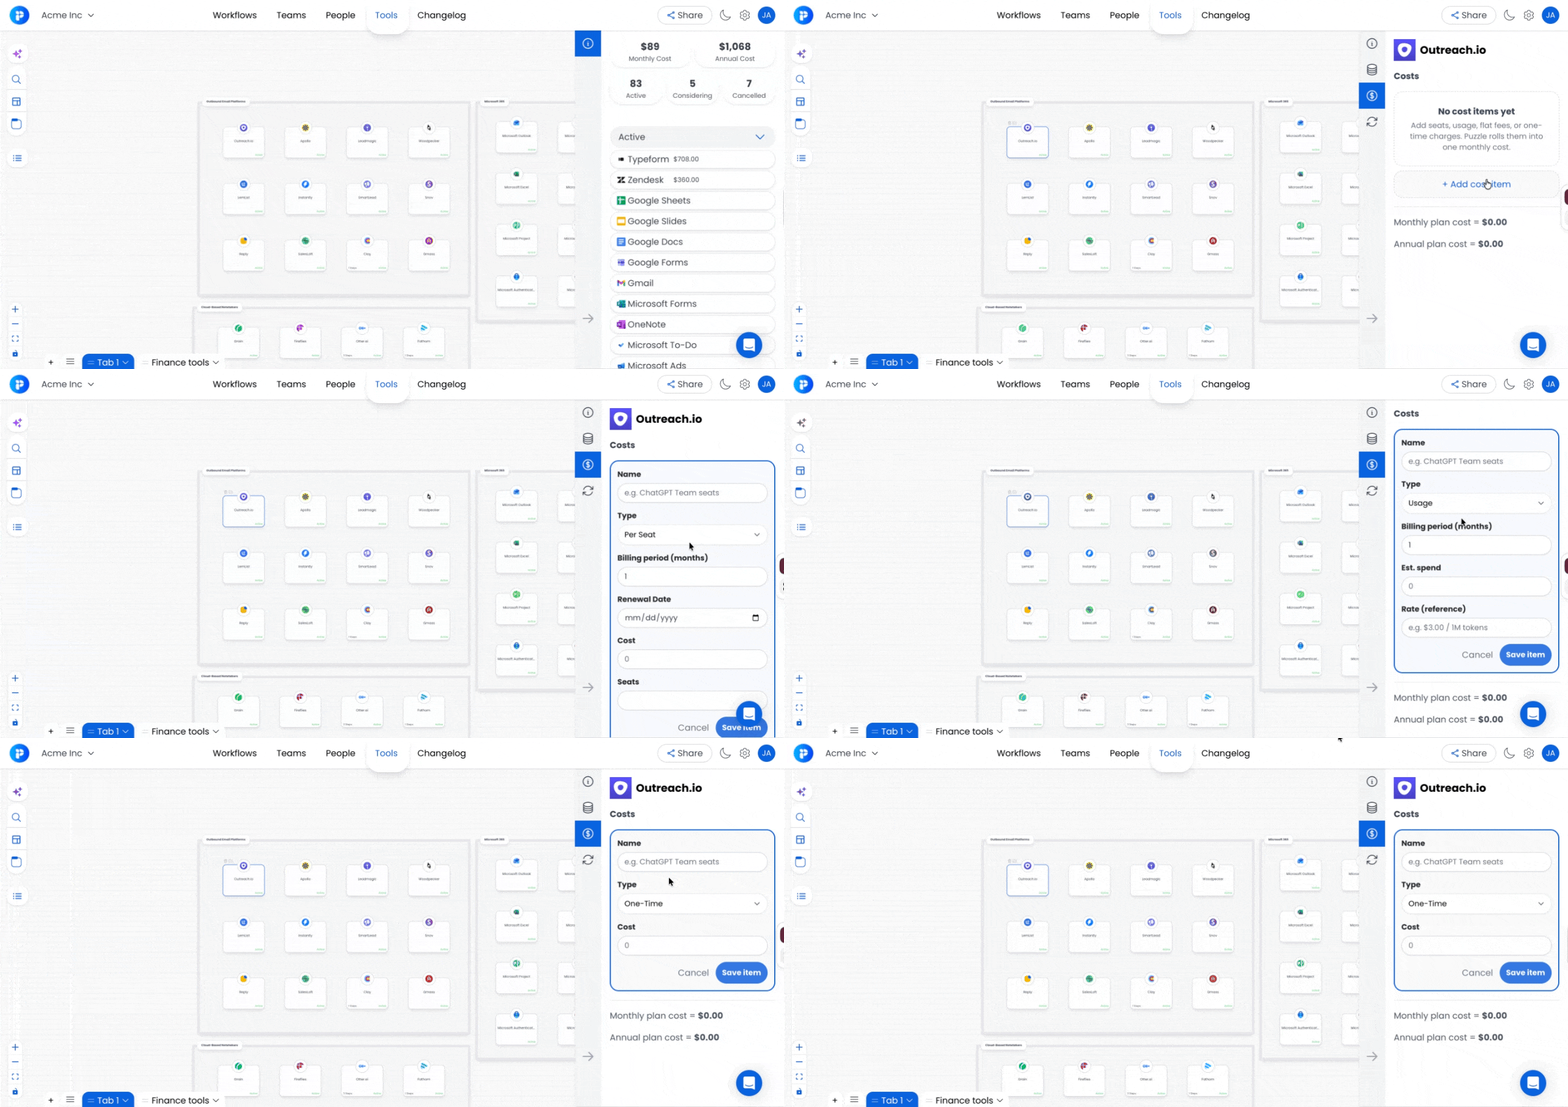
📊 Cost totals: Recurring cost items roll into Estimated Monthly Spend and Estimated Annual Spend on the tool card and Tool Group sidebar. One-Time costs display separately. ⚠️ Tool cost inputs are available on plans with tool costing (Starter, Optimizer, Enterprise).
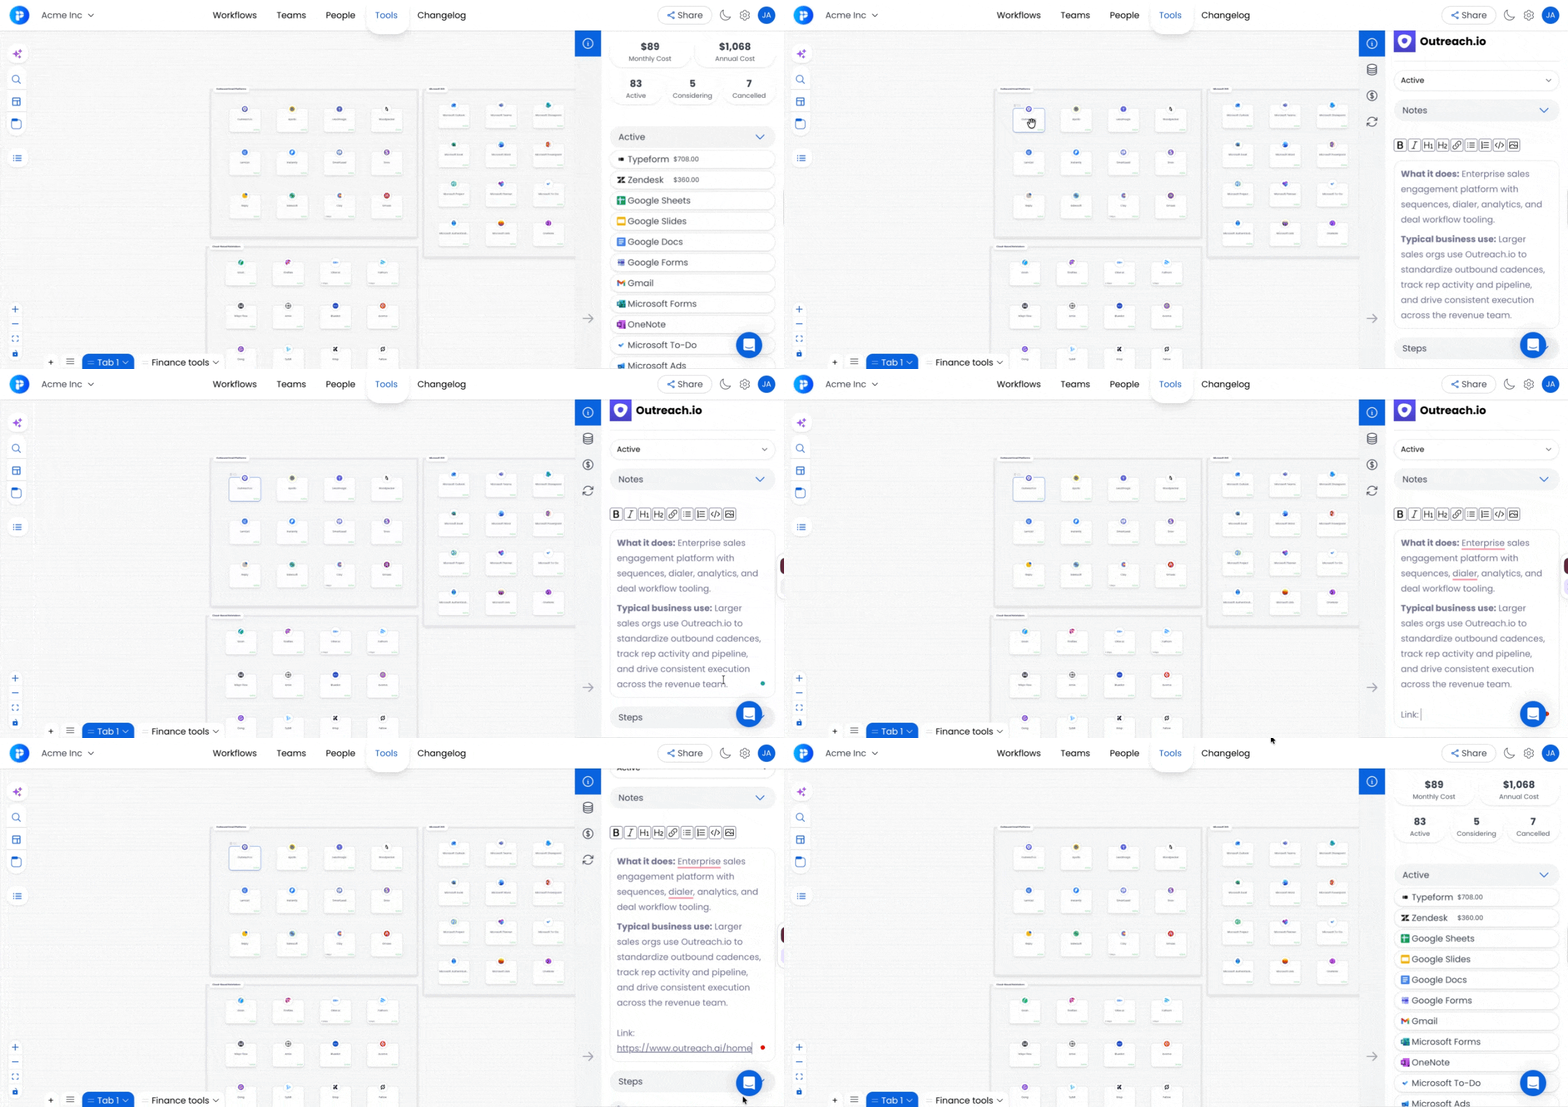
📝 Add Notes
📝 Add Notes
Capture additional details like the tool's purpose, teams using it, licensing terms, or supporting documentation (PDFs, PNGs).
📋 Step Summary
📋 Step Summary
The tool's sidebar shows a summary of all steps where the tool is used. Click any listed step to jump to it in the Workflow canvas.
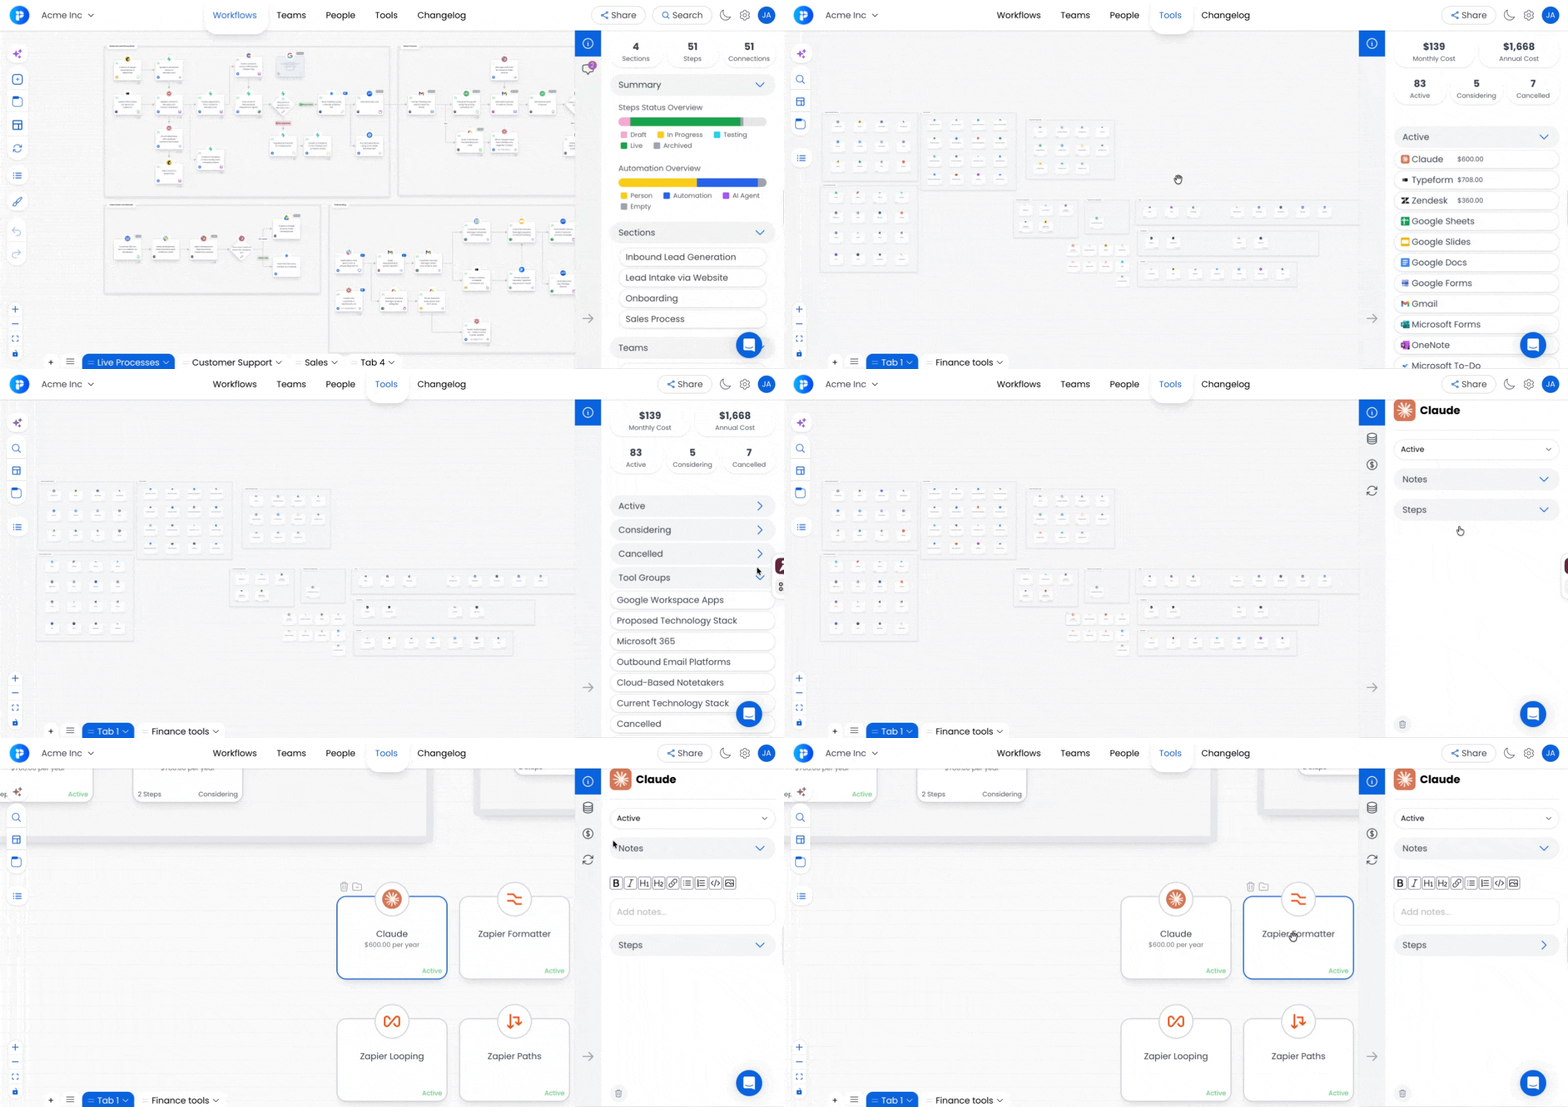
🔗 Edit and Open the Tool URL
🔗 Edit and Open the Tool URL
Each tool has a clickable URL that opens the tool in a new tab. By default, the URL is inherited from the Puzzle Tools Library, but you can edit it per workspace to point to your specific instance (e.g., your team's HubSpot portal or your custom Notion workspace).
Click the link icon in the tool's sidebar to open the URL in a new tab
Click the URL field to edit it to a custom link for your workspace
Save your changes — the edited URL applies only to your workspace, not the shared Puzzle Tools Library
💡 Tip: Use custom URLs for tools where you want your team to jump straight into your specific account (e.g., yourcompany.hubspot.com) instead of the tool's homepage.
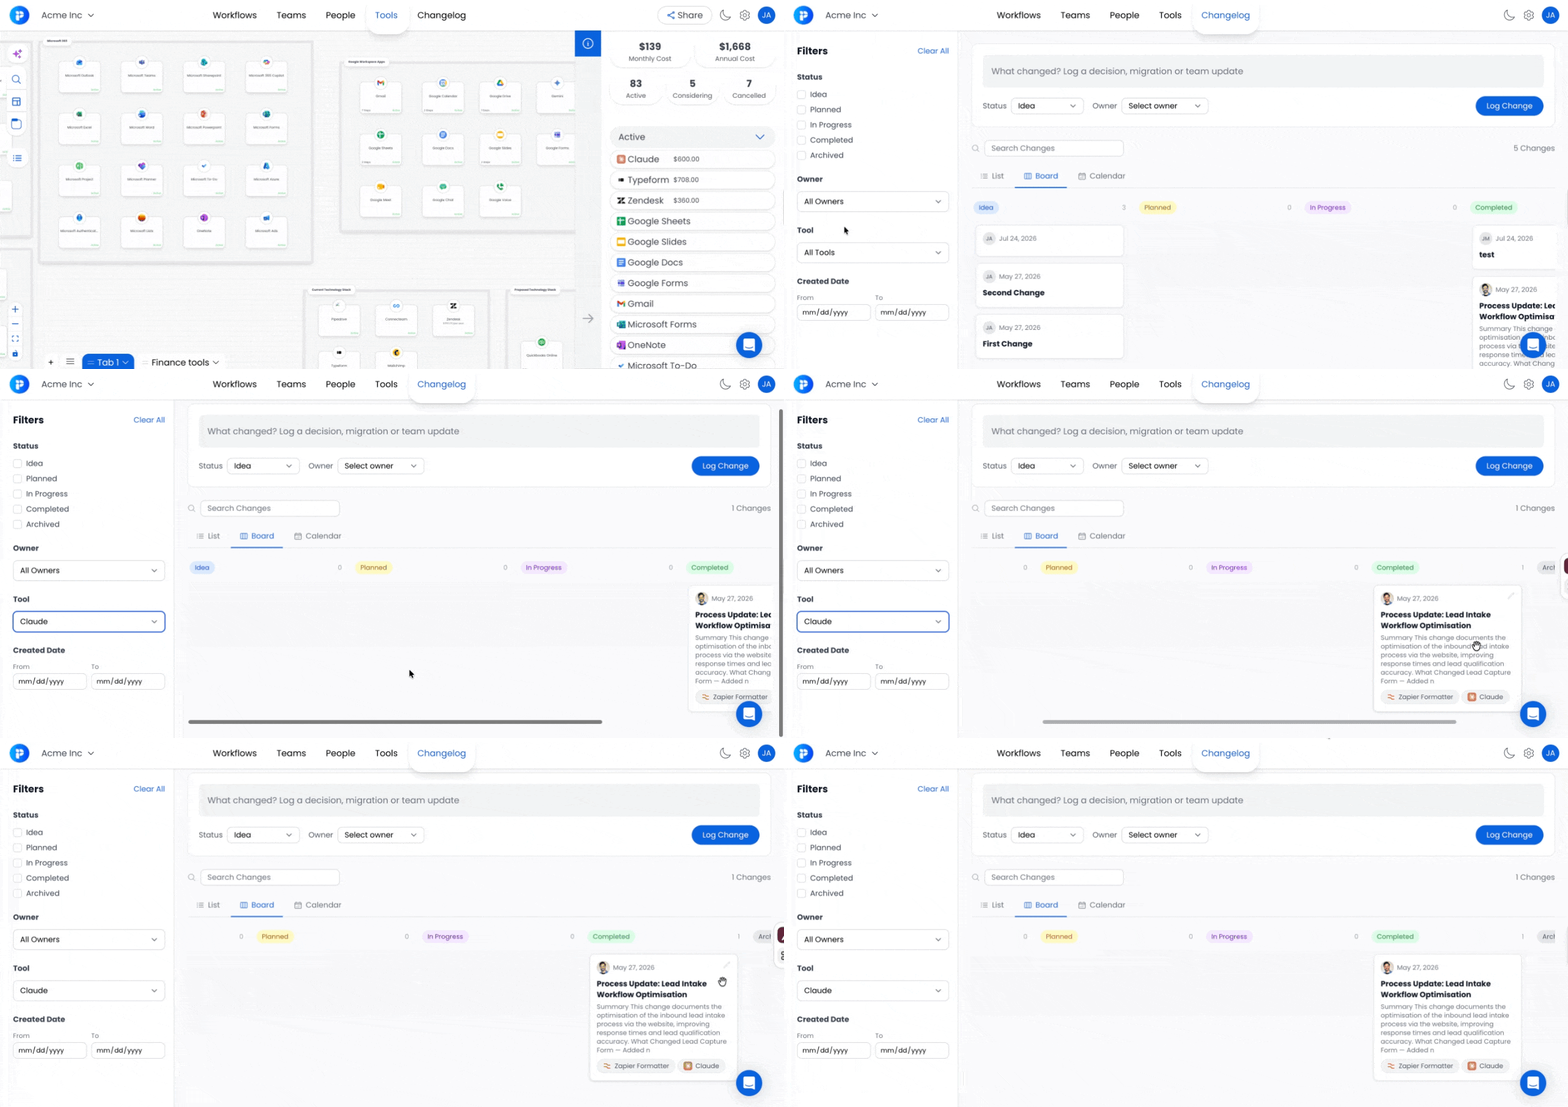
📜 Changes Tab
📜 Changes Tab
Open the Changes tab to see every Changelog entry linked to this tool — including entry title, status, owner, and date. Click any row to open the full entry in Changelog.
🗑️ Remove Tool
🗑️ Remove Tool
Click the trash icon to remove the tool from your canvas. This does NOT delete it from the Puzzle Library. To delete permanently, contact support@puzzleapp.io.
🛡️ Safety Check When Deleting Tools: If a tool has linked Entities or Attributes, Puzzle will display a confirmation modal showing how many are connected. This prevents accidental deletion of important data structures tied to your workflows.
3️⃣ Add Entities & Attributes to Tools
3️⃣ Add Entities & Attributes to Tools
Each tool can have one or more Entities to document associated data (e.g., Contacts, Orders).
📌 To add an Entity:
Click the database icon in the tool’s sidebar.
Click Add Entity and give it a name.
You can then begin adding attributes for that Entity—either individually or in bulk.
Once an Entity is connected, attributes can be assigned to steps across your workflows to reflect how data flows through your systems.
To learn more about Entities & Attributes and how they can benefit your operational processes, please visit this article.
🛡️ Safety Check When Deleting Tools
If a tool has linked Entities or Attributes, Puzzle will display a confirmation modal showing how many are connected. This prevents accidental deletion of important data structures tied to your workflows.
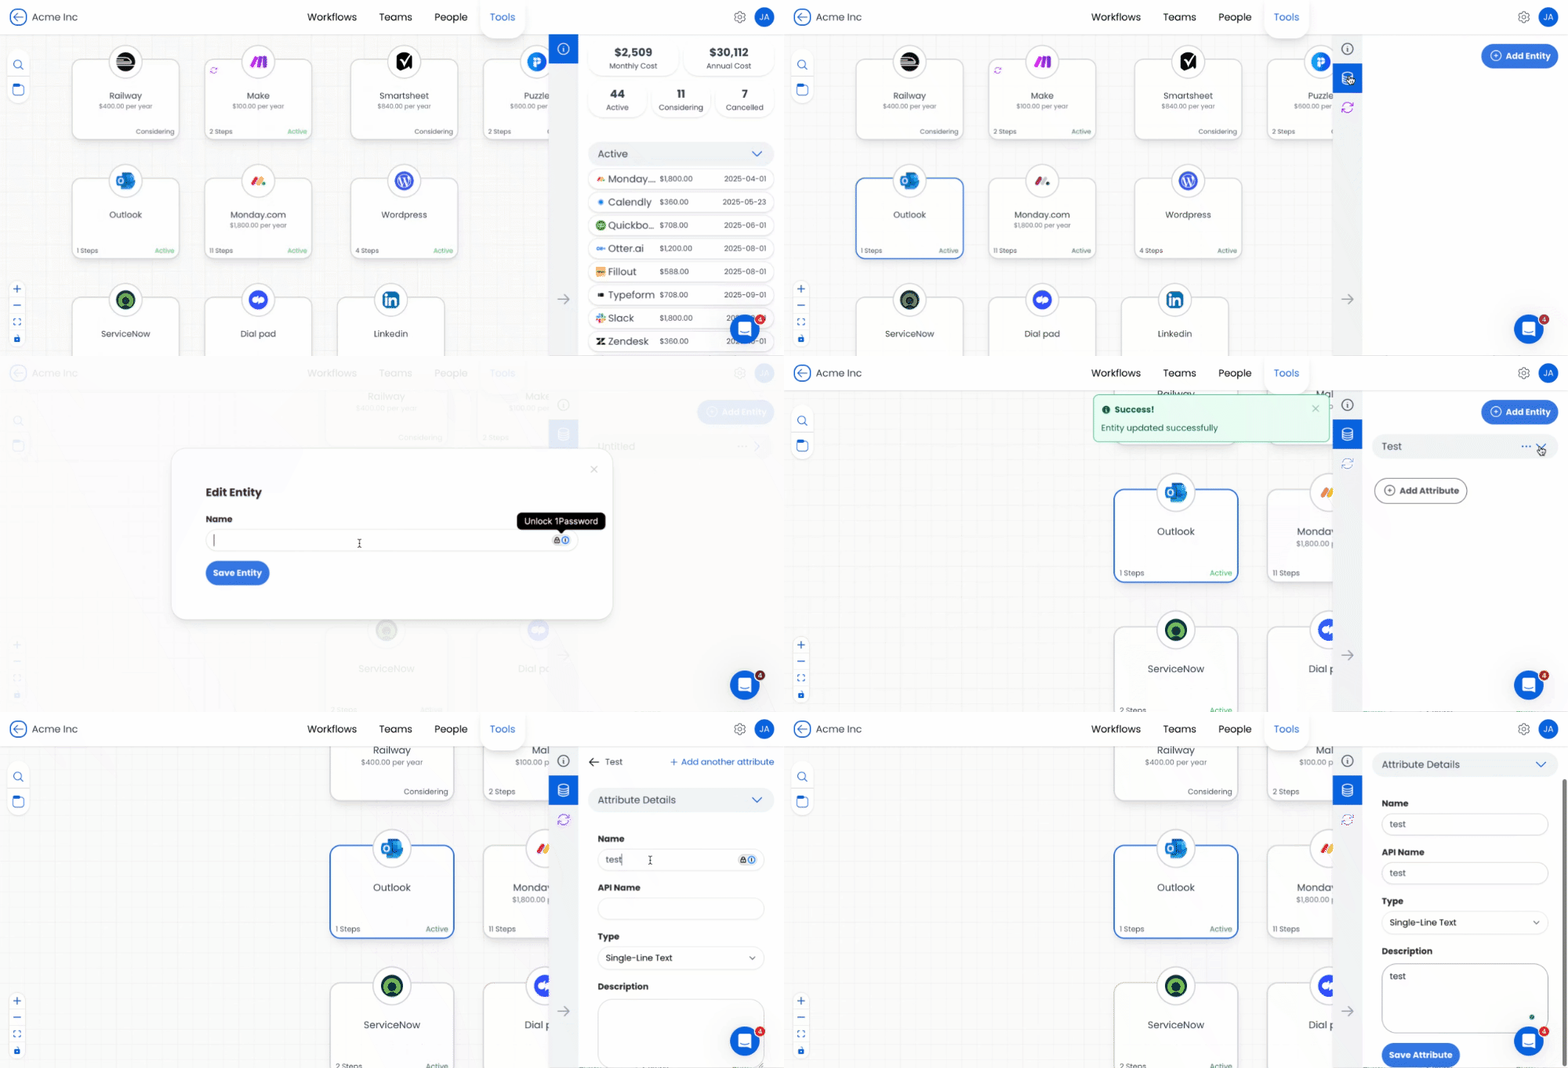
💡 You can also manage and organize all attributes in a structured List View from the Tool Canvas, making it easier to review and update your data model at scale.
4️⃣ Organize Tools with Tool Sections
4️⃣ Organize Tools with Tool Sections
🗂️ Group Tools into Tool Sections
🗂️ Group Tools into Tool Sections
Tool Sections aren't just for visual organization — they help you make smarter, cost-aware decisions by:
Separating tools by Department (Marketing, IT, Finance, Operations)
Comparing stacks (e.g., Recommended Tech Stack vs. Legacy Tech Stack) to evaluate savings
Isolating project-specific tools for easier management
Analyzing costs across business units in real time
To create or manage Tool Sections:
🟢 Open the Tools Canvas in your workspace
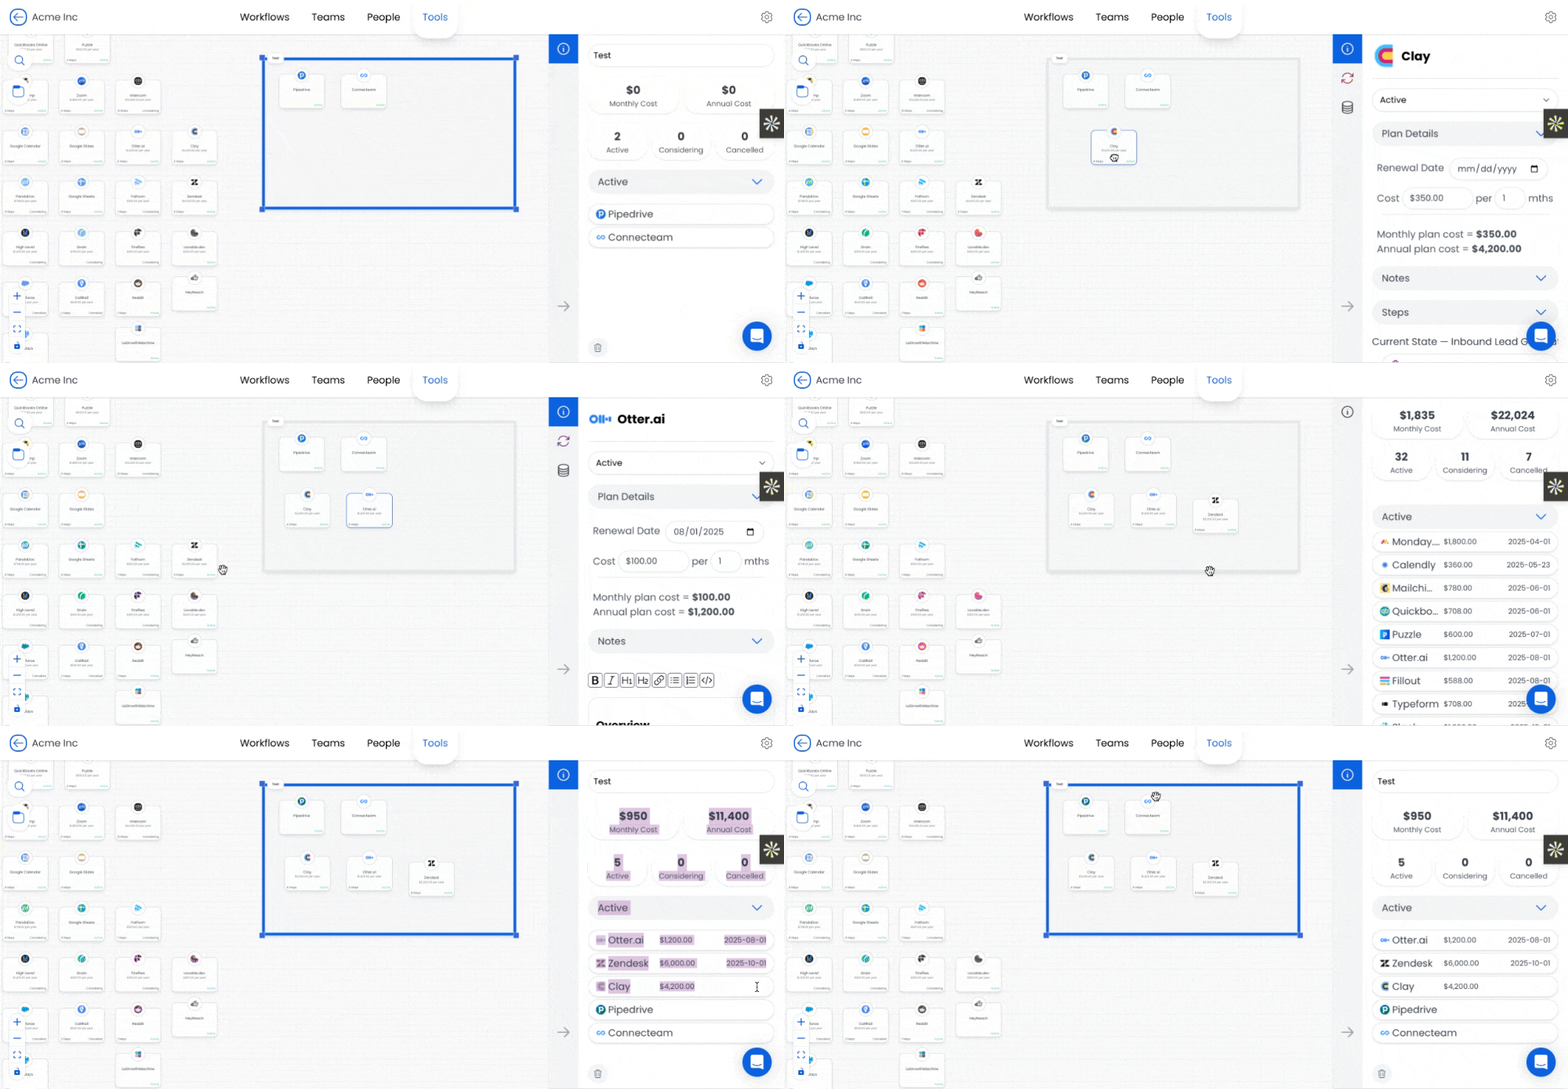
👆 Click + Add Tool Group to create a new group (e.g., "Sales Tools" or "Legacy Stack")
🧰 Drag and drop tools into your sections
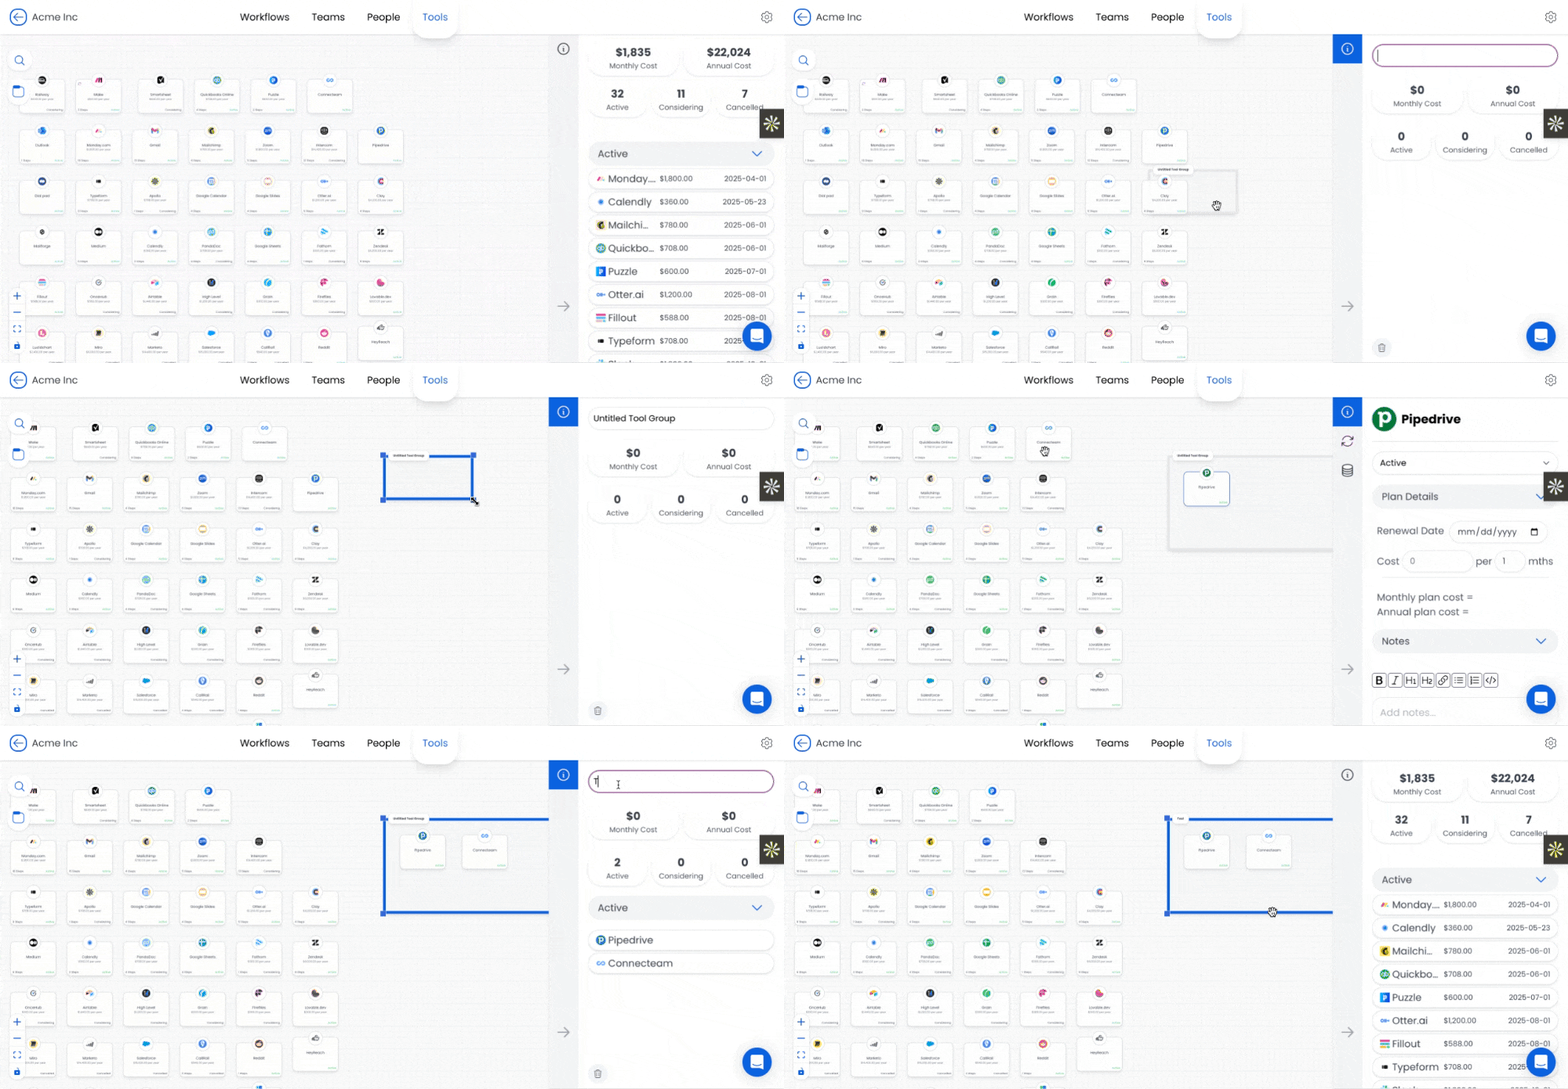
Cost Summaries by Section: As you assign tools to sections, Puzzle updates your Tool Group sidebar with Total Monthly Cost, Total Annual Cost, and Total Active Tools per section.
💡 Perfect for leadership reviews, process audits, or cost optimization projects.
📂 Save and Reuse Tool Templates
📂 Save and Reuse Tool Templates
Reuse and share common tool stacks across workspaces with Tool Templates. Templates work like Workflow templates — save a tool group as a template once, then apply it in any workspace.
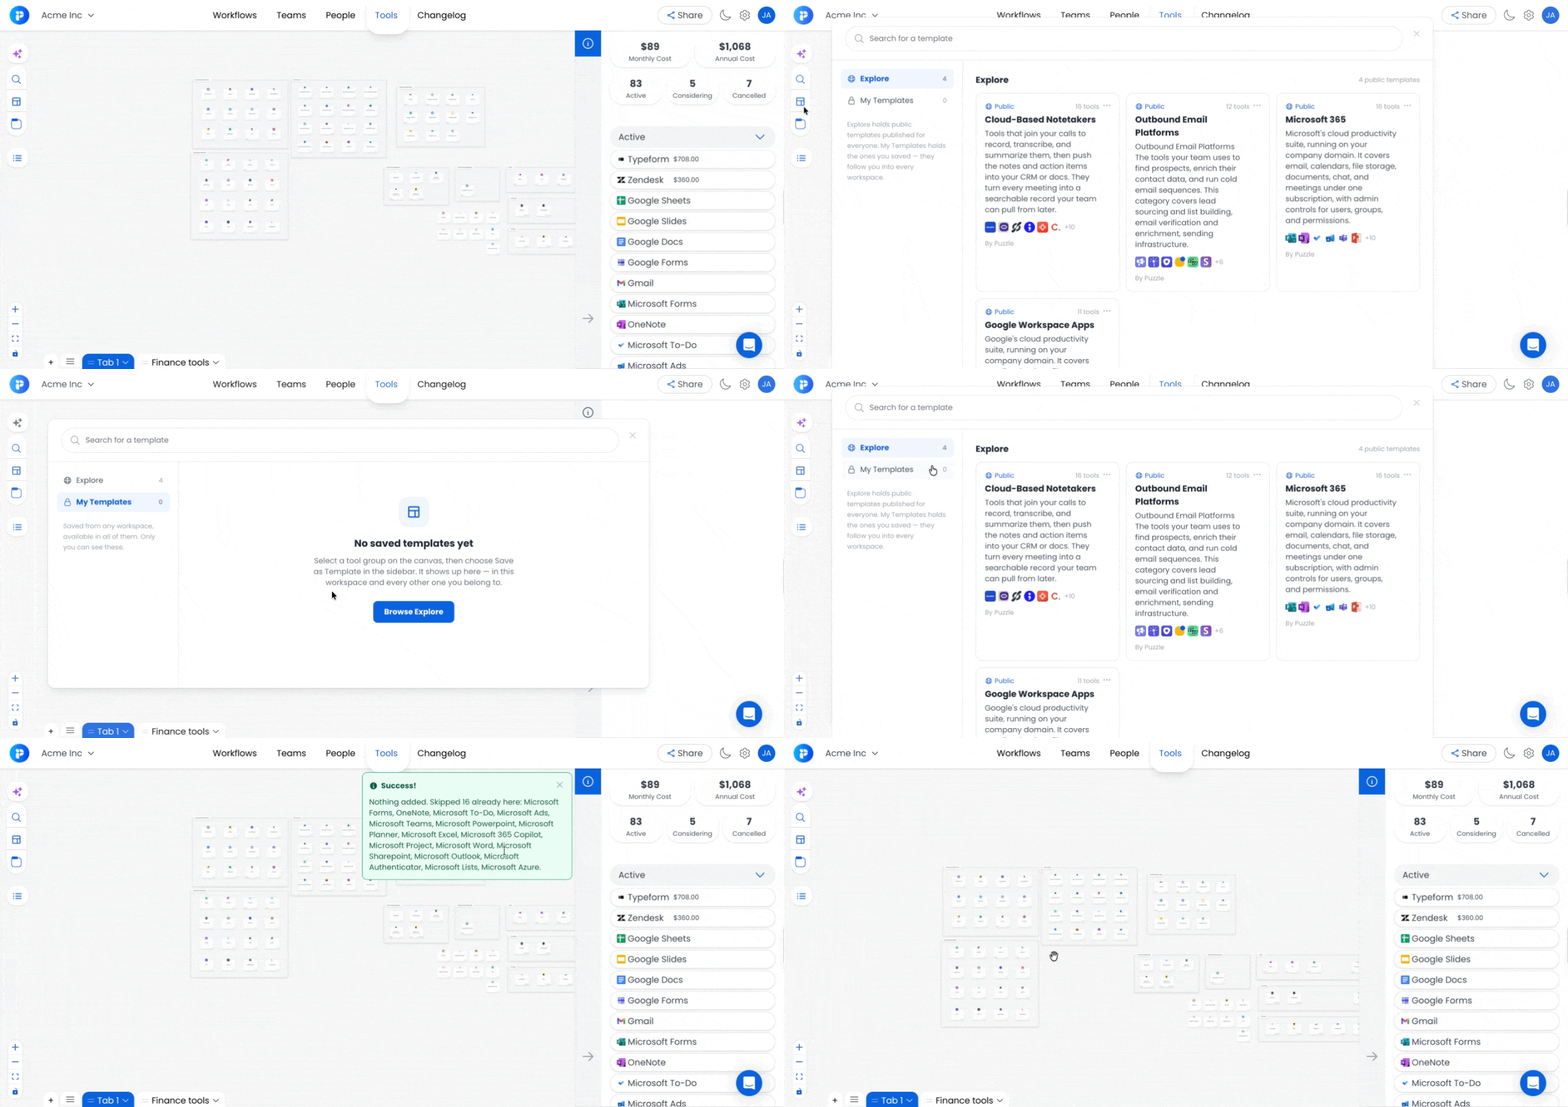
📂 Browse the Template Library
Click the template icon on the Tools Canvas to open the library
Two tabs to browse:
Explore — Puzzle-curated templates (created by the Puzzle team, not editable)
My Templates — Templates you've saved
💾 Save a Tool Group as a Template
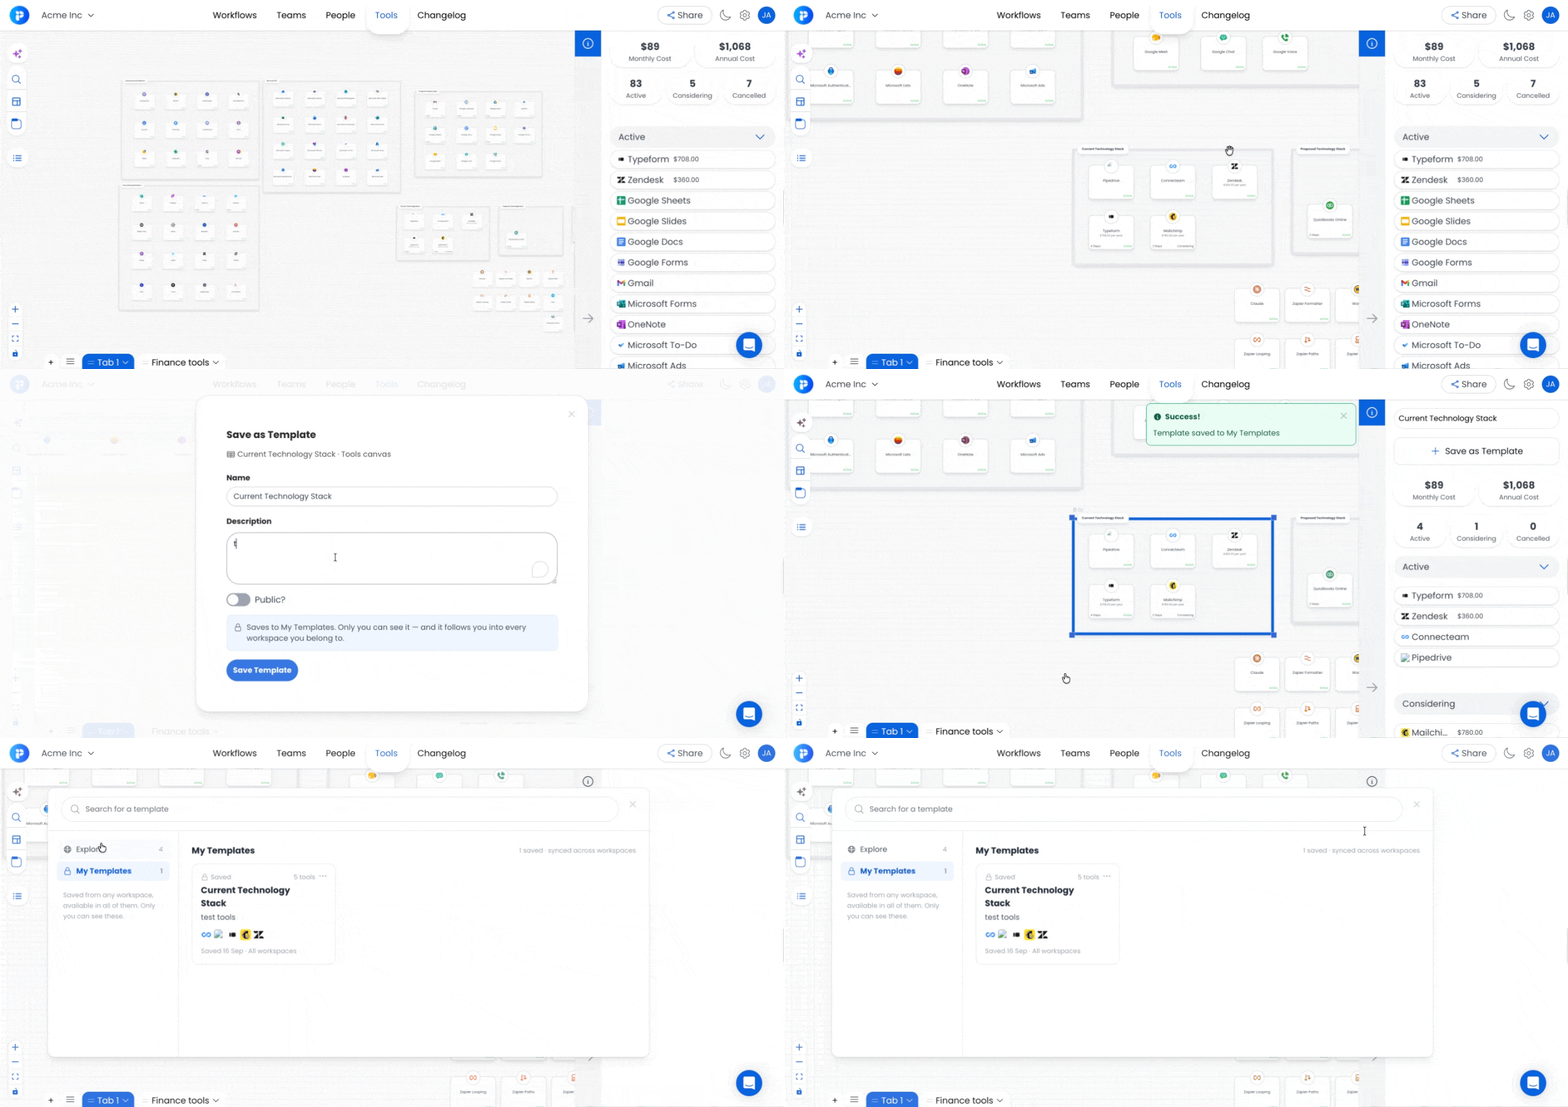
Select any tool group on the Tools Canvas
Click Save as Template in the tool group sidebar
Enter a Template Name (e.g., "Sales Stack", "Client Onboarding Toolkit") and a Description
Save — it will appear under My Templates
💡 Templates carry over tool names, layout, and notes — but not cost or billing information.
⚙️ Use, Edit, or Delete a Template
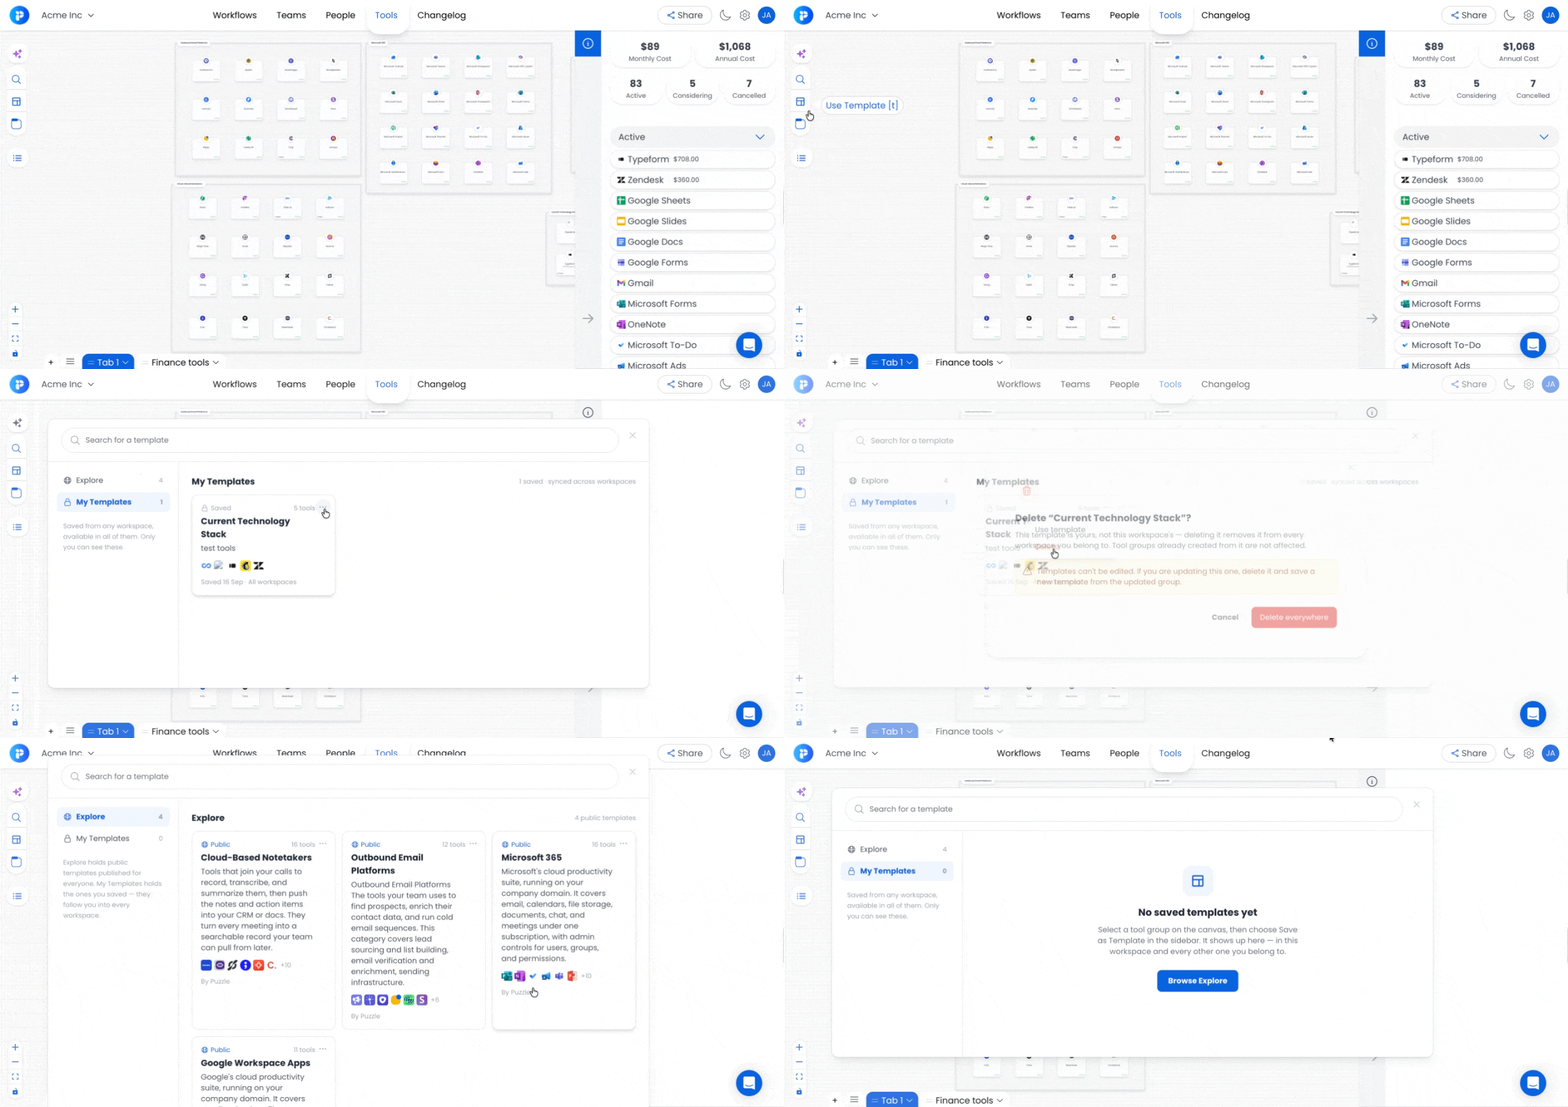
Hover over any template card to see quick actions:
Use Template — Adds the template to your current Tools Canvas
Edit Template — Only visible if you're the creator. Click to edit the template's name and description. Template content (tools and layout) can't be edited here.
🗑️ Delete — Removes the template (confirmation modal appears before deletion)
💡 You can only delete templates you created. Puzzle-curated templates under Explore are for viewing and use only.
5️⃣ Connect Tools to Workflows and Share
5️⃣ Connect Tools to Workflows and Share
🔗 Assign or Unassign Tools in Workflow Steps
🔗 Assign or Unassign Tools in Workflow Steps
Connect tools directly to specific workflow steps so it's clear which systems are involved at each point.
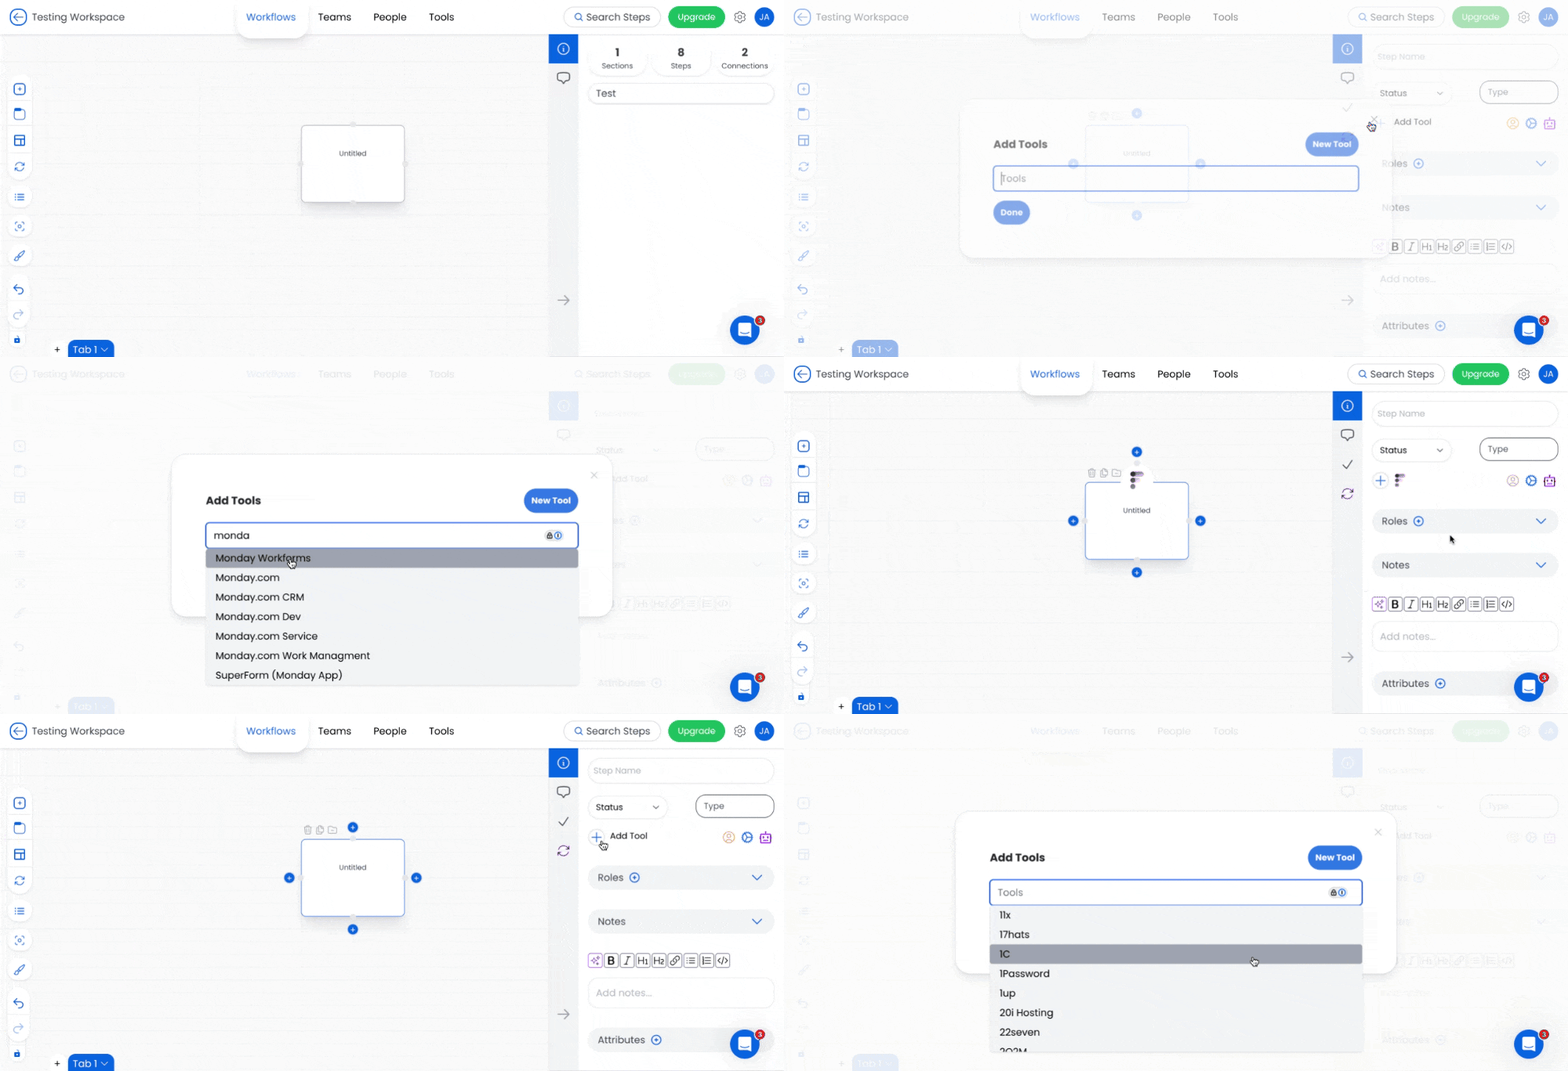
➕ To Assign a Tool:
Open the step in the Workflow canvas.
In the sidebar, click + Add Tool.
Select the relevant tool from your workspace’s tool list.
Once assigned, the tool icon appears in the step’s sidebar.
❌ To Unassign a Tool:
In the step sidebar, hover over the tool icon.
Click the X to remove it from the step.
This removes the visual and functional connection without deleting the tool from your workspace.
💡 Use tool assignments to visualize tech stack dependencies across your workflows and make reviews or audits easier.
📤 Share Tool Groups via Shared Views
📤 Share Tool Groups via Shared Views
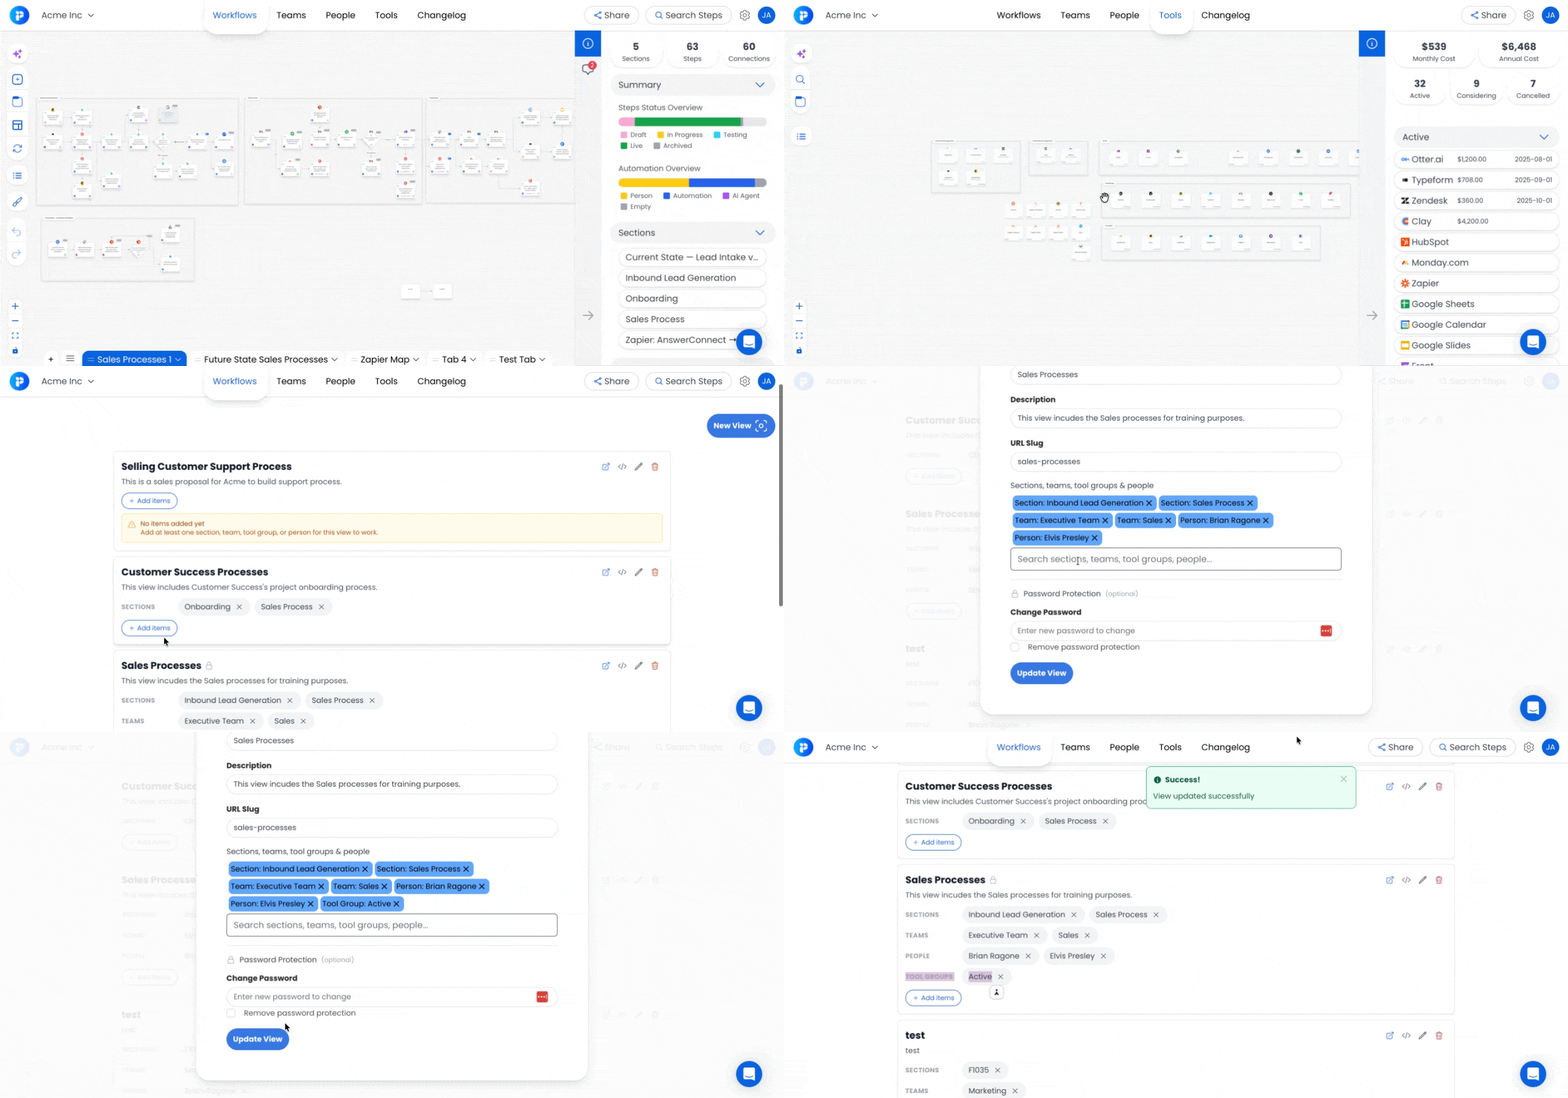
Share specific tool groups from your Tools Canvas with stakeholders, clients, or vendors.
🎯 Click the Share button in the top-right corner of the Tools Canvas
➕ Create a new Shared View or add to an existing one
🧰 Pick the specific tool groups you want to include. Shared Views also support content from Workflows, Teams, and the People Canvas
🔗 Share the generated link. Viewers see tool cards, logos, notes, and any linked details — read-only
For the full walkthrough on creating and managing Shared Views, read the Shared Views: Share and Collaborate article.
💡 Best Practices & Tips
🔁 Review Tools Regularly: Deactivate tools no longer in use to keep your workspace clean.
📂 Group for Clarity: Use Tool Sections to separate tools by use case or department.
💰 Track Renewal Dates & Costs: Stay on top of budgeting with the sidebar’s cost view.
📝 Use Notes Effectively: Capture why a tool was added or key details about its contract.
📈 Monitor Usage: Use the usage summary to understand each tool’s role across workflows.
Conclusion
The Tool Canvas makes managing your tech stack easier. It provides a clear overview of your tools, costs, and renewal dates in one place. By categorizing tools, tracking costs, and integrating them into workflows, you can make informed decisions and eliminate unnecessary costs.
With cost summaries and a structured approach to tool management, you’ll always stay in control of your technology investments. Start using the Tool Canvas today to streamline your operations and keep your tech stack organized, efficient, and cost-effective!
Still need help? Ask the team